
One phrase you might hear used when describing X-Wing strategy is "whoever commits first loses." Like all catchy X-Wing proverbs, it's a useful rule of thumb, even if it's not always true. But it's also a bit ambiguous. What does commitment in X-Wing look like?
Here's what I look at when identifying commitment in an X-Wing game.
First Steps
The early game, specifically the first couple of turns of the game where ships are unlikely to engage, can be seen as a fairly uneventful (and typically brief) sequence leading up to the more exciting tactical dog fighting that we expect from a game of X-Wing. But for the observant, this stage of a game can be extremely telling in identifying key items of information about how your opponent chooses to play.
The first turns of X-Wing can almost be considered a duel of counter-espionage efforts. Since ships in X-wing are generally forced to advance, each turn thus requires players to make decisions on how they're positioning their ships. If the player has a strategy, even one they're not conscious of themselves, this is where you get the first indications of what it is. Do they intend to split their forces and set up one or more flankers? Will they be jousting head-on, or feinting a joust and turning away? Do they aim to drag you through the rocks, or plunge into the obstacles themselves to force you to engage into the obstacles and have limited options in the post-engagement turns?
But no player wants their opponents to know any of this. Secrecy and unpredictability are key elements of X-Wing; that's why we flip our dials face down, after all. So the player who is able to disguise their opening movements and hide their larger strategy has a one-sided advantage. It's Sense on a strategic level, minus the Force point cost.
Where do we lose this ability to hide our master plans? Let's look at what I call Commitment Points.
Decide, You Must
I'm never quite sure whether to call them pivots, commitment points, points of no return, or something else more elegant and/or Star Wars-y, but what I'm talking about are points on the board where you or your opponent have to commit, to some extent, on where your ships are going. These points are almost always seen in the form of obstacles.
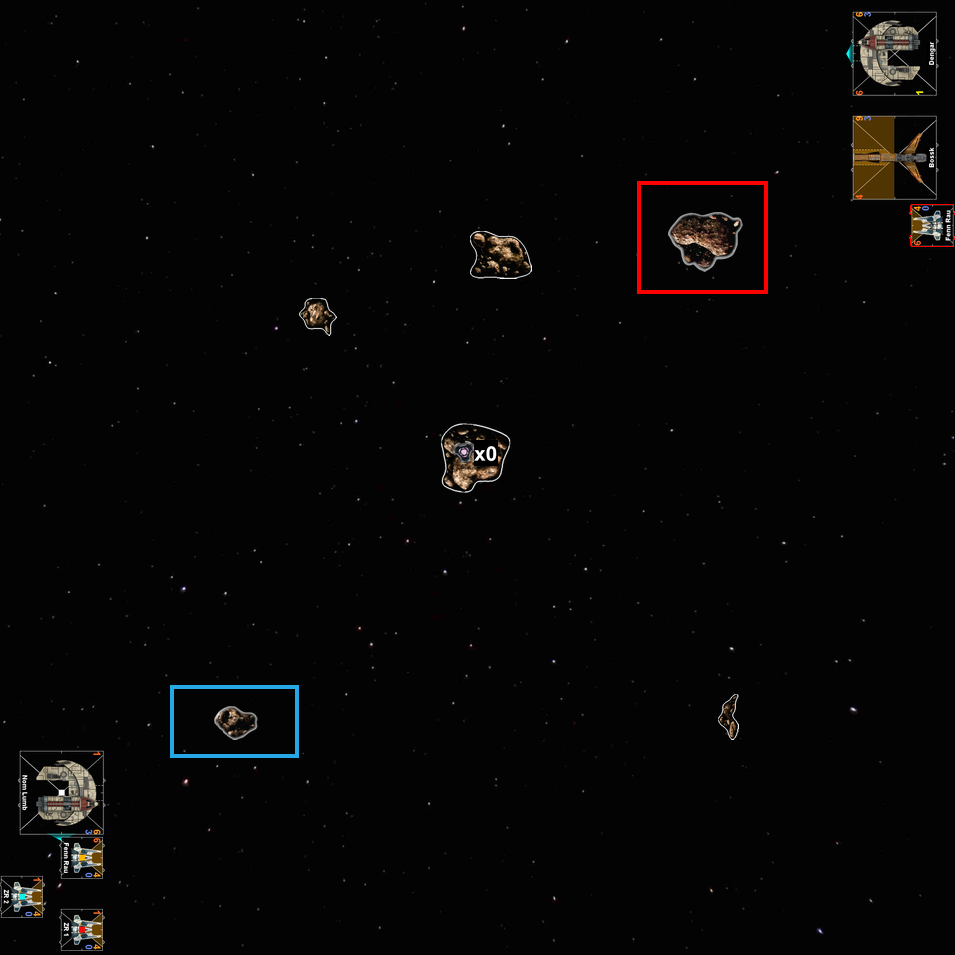
Let's look at an example from a recent game I played on VASSAL that I felt demonstrated a few great examples of commitment points. Here's how we set up:

I'm set up on the lower left, and my opponent is deployed at top right (as is typical in VASSAL, we're playing left-to-right). Most of my ships are initiative 1, while my opponent is i4 and i6 (and moving after my i6 ship, thanks to a bid). Generally, my opponent will have more information to make decisions, so based on initiative, I'm at an informational disadvantage.
But my opponent also has a less responsive list than I do. Bossk is among the clumsiest ships in the game, and Dengar is strong but limited in that unique JumpMaster 5000 fashion. 75% of my ships are Fang Fighters with great dials, and a Nom Lumb that I won't be requiring any fancy arc dodging or outmaneuvering from. All of this means I might have a bit more flexibility in giving away my plan than my opponent will.
What are our goals here? For me, it's reasonably straightforward: Nom Lumb wants to get into my opponent's ideal positions and draw bumps and shots, punishing them with Dengar gunner and counter attacks. The Zealous Recruits want to get into range 1 and deal damage, absorb shots, and block opponent ships, roughly in that order of priority. Finally, Fenn wants to play a bit safe and be either out of range or range 3 of enemy ships, or right at range 1 and able to do Fenn Rau things.
My opponent's goals are likely somewhat similar. Bossk will likely want to get in close and reinforce to eat damage, and this Bossk has Intimidation so we can assume that the Bossk flank is not on the menu here. Dengar will likely be looking to flank, and if I turn on him, my opponent is probably happy to tolerate that too as it means Dengar will be shooting multiple times. My opponent's Fenn Rau plan is likely the same as my own.
So, where are the commitment points here? Early on, these are the ones we're concerned about:
Let's focus on my opponent's commitment point first. Immediately, my opponent has a decision to make with Bossk. Bossk can either go straight, or he can hard turn left. The only other option is a hard stop, but this is only staving off the inevitable, as Bossk's blue maneuvers mean he'll almost certainly be going straight to clear stress.
With Bossk uncommitted, this is a rough idea of all of the approaches I need to consider with Bossk:

Basically, we've determined that Bossk's flight plan is "anywhere."
Dengar has the same decision to make right now. Whatever he does this turn is going to commit him to either starting by going along the top edge of the board, or down the right side.
So, with the above in mind, we revisit my goals. I want jousting Fangs and a Nom Lumb in the mix, and I don't want Fenn to die early. Right now, I can speculate where to go in order to make sure these things happen, but what would make this decision easier would be to delay. I also have a commitment point in my corner, but look closer. Even after I commit to that cornered asteroid, because of how open my side of the board is, I can reasonably change course without it taking an awkward amount of turns. Plus, I'm mostly a bunch of Fang Fighters, and they can delay these decisions with combinations of hard turns and barrel rolls.
(An unrelated aside: My starting deployment is flawed for several reasons. Can you identify why? I'll tell you what I think I messed up at the very end.)
Now, fast forward to turn two, planning phase:

We now have a ton of additional information to process! Let's look at what our opponent has told us.
Look at Bossk first again. He's made his choice on the large cornered rock, and that choice was to go north. We now can extrapolate the following potential lines of play:

A lot fewer ambiguous red arrows in every direction now! That big shaded blue area is all now effectively out of scope for Bossk's future maneuvers, and the non-shaded area is reasonably unlikely. If he tries to go there after the choice he made on the first asteroid, it will mean turning away from my entire force, and that spells death for any YV-666. Bossk will either be continuing along the top or cutting left right now, because he also now has a new commitment point:

If Bossk does not hard turn now, then thanks to that commitment point identified above, he's stuck going straight. In fact, right now we can narrow down Bossk's maneuvers to probably around three broad choices: 3 forward (give or take a speed), 2 or 3 hard left, or a hard stop.
Dengar and Fenn are also committed to avoiding that far right board edge any time soon. Fenn can get there in a couple turns, if he's really desperate, but it would mean being exposed to my whole list. Same goes for Dengar, in fact.
Looking at this first decision, and our basic assumptions about our opponent's game plan, we can start making observations on strategy and anticipating future moves:
- Dengar remains on the outside and moved fairly far in the first turn, suggesting he's going to blow right by that next commitment point and flank wide. Interestingly, the far right obstacle might make it tricky if he's not careful with his next maneuver.
- Bossk is not deviating from our expectation that he will want to be central and jousting. It seems more likely he'll turn in here, but we can't discount the possibility that he also goes straight and turns in after the next commitment point, hoping to catch me out of position if I fly my Fenn conservatively here. However, this will also mean bringing Bossk right into the heart of the obstacle clump, and his future positioning will be impaired. The reasonable call here is to assume he's hard turning but account for the possibility that he does not.
- Fenn's position does not entirely line up with the original expectation. Perhaps he intends to follow Dengar? Otherwise, flying in from behind Bossk might be problematic and lead to Fenn having to navigate an extremely crowded board.
Considering our own game plan, we can make some decisions here. If the intention was to flank with Fenn as safely as possible, then we now have a relatively safe haven in the form of that big blue area I highlighted above. We also have a Bossk poised to come up the middle and a Dengar who looks to flank wide (and who we would ideally like to not expose our Zealous Recruits to if we can avoid it).
We also don't have any real commitment points to contend with here, from our perspective. Our ships all "picked a direction" on our cornered rock, but this turn we can hard turn and change the plan. The only obstacle we're truly thinking about this turn, for our ships, is the bottom right asteroid, as Fenn, if he went fast enough, would need to consider by the end of this turn whether he'll want to go outside of it or cut the corner. But remember, we're playing the counter-intelligence game, and I don't want my opponent to know where he's going! So therefore, I'll be flying Fenn at a suitable speed where both options remain open next turn.
No shots have been fired here so far, and yet an awful lot is already happening in this game! Let's skip ahead again and look at the planning phase for the next turn, turn 3:

We now probably have all the information we need to understand how the opening engagement is going to look. Dengar will be flanking wide, and those rocks are going to cause problems with him doing it any time soon. Asteroids are preventing him from banking in or going forward fast. Our opponent has told us that Dengar will not be arriving at the party promptly, and we need to take this opportunity to get an uneven engagement. Here's what we can reasonably anticipate from Dengar:

Red are things he might do this turn, and blue are things he might do the turn after that. Massive areas of the board are outside of his grasp and will be for the foreseeable future. Our most precious piece, Fenn Rau, is in absolutely no danger from Dengar for a while.
Bossk has indeed turned in, and by choosing the 3 hard, he already skipped the next commitment point, the large pivot rock in the middle of the board. Here's his outlook for the next two turns:

Bossk's only real options at this point are whether he wants to follow this course now, or hard stop and put it off for a turn. Anything else that he might do (turning away from the engagement, flying into the big rock) are poor enough plays that we don't even need to consider them. You don't have to predict every opponent move, just the ones that are likely to hurt you!
Finally, Fenn's position has some struggles as well. He's in line with the rock in front of him and therefore can't go fast to run left of the big rock in the middle. If Bossk hits the brakes this turn, Fenn has almost no good options, in fact (which should give us some insight into whether we can actually anticipate a Bossk stop here). Fenn is thus nearly as committed to Bossk's path as Bossk is himself, as most other routes leave him away from the opening engagement and doom Bossk to fighting 1v4 against my list.
Because of these commitments from my opponent, we can make very informed decisions now. The Fangs can hard turn and boost in and probably get shots on Bossk. Fenn can turn here and play it safe, either being in R3 or having no shot at all, but able to dial a straight maneuver next turn that, combined with the boost option, will give him range 1 with a focus token. Nom Lumb can park right where he needs to this turn so that next turn he can become a royal pain.
And what does my opponent know? Not nearly as much, because of my open board and conservative choices. Are my non-Fenn ships going to hard turn and ambush Dengar? They could! Is Fenn turning in or going the long way around that cornered rock in order to flank extra wide? I've committed to neither option so far! My opponent can see most of my initial strategy now (Fenn to flank, Nom to be central in the board) but my options for following turns are still a mess of red and blue arrows pointing in a lot of directions.
The combat phase of turn three ends up looking like this:

Other than the Zealous Recruits being perhaps 1 ship length too far back, this is a decent tentative first engagement for me, and a nightmare of a turn coming up for my opponent. Bossk is in big trouble, Fenn is running out of options, and Dengar has precisely one maneuver option for the next turn. All of this was largely because we committed later, leaving our good options as open as possible, and were able to make actionable observations based on where our opponent committed.
Foresight
Now that we see how they can be used, we should make sure we know when a commitment point is relevant.
Consider Wolffe below. He's approaching an asteroid. Is it a commitment point for him right now?

The answer is that yes, this is a very relevant commitment point. Without considering the context of the rest of the board, we can see here that Wolffe appears to have a key decision: a hard turn to go to the right of this asteroid, or a straight maneuver that commits him to not going right. These are mutually exclusive and the decision is forced on this turn:

Wolffe has committed, even though if he went straight, he hasn't actually passed the asteroid yet. If he wants to change his mind and go right, he'll be hard turning right onto the asteroid, and this is rarely a good move for Wolffe!
Now, what about this. Is this a commitment point for Wolffe on this turn?

It looks almost the same as the first example, but it's an illusion. Because of Wolffe's size and dial, he no longer has an option to turn right without landing squarely on the asteroid. Wolffe is almost two base lengths away from the asteroid, but he's committed. You can safely plan around Wolffe going straight here, and if he doesn't, then he's on the rock and you're probably even more okay with that.

Same asteroid, same positioning, but different ship. Is the situation different now? Very much so! The small size TIE/ba, with a dial featuring a 1-speed hard turn, is still able to make a choice here, as the hard 1 fits nicely (and threatens a variety of options on the following turn). Larger ships and ships with poorer dials (specifically a lack of either hard turns or white barrel rolls) tend to be more likely to have to commit early. Think of an ARC-170 Sinker Swarm, or a group of Dorsal Turret Veteran Turret Gunner Y-Wings, or a Lambda shuttle. Some of these lists need to commit to a rock turns before they even get near it (or find themselves in uncomfortable predicaments if they didn't).
Ultimately, this becomes an exercise in being cognizant of your opponent's ship sizes, dials, and action bars, and having a good sense of where X-Wing maneuvers will land a ship of a given size. Using this information, you can identify pertinent commitment points and use them to roughly map opponent future turns. Especially early in the game, you don't need to predict precise maneuver choices, just the broad strokes on a strategic level.
Later, when the game becomes more tactics-focused, these commitment points become more useful in ruling out specific potential maneuvers. They also allow you to foresee the value of future moves, both for yourself or your opponent. If what feels like the best move this turn will leave you with a problematic encounter with a commitment point next turn, you may want to reconsider something less restrictive, board position-wise.
You Cannot Hide Forever
There are a few other things to keep in mind when thinking about commitment points.
First, some lists are much better than others at staving off these decisions and delaying while the opponent shows their hand. The StarViper is infamous for doing this, as are ships that move laterally (such as the TIE Phantom or the HMP Droid Gunship). The Phantoms, for example, can end a turn pointed right at the commitment point in question, forcing the opponent to do their next planning phase without knowing which way the Phantoms will be decloaking.
Any ship that has hard 1 turns and barrel rolls is also usually quite good at delaying and avoiding (or recovering from) commitment points. Currently, the Nantex is a prominent example. The final two matches of the Corellia Galactic Championship Qualifier (here and here, courtesy of Gold Squadron Podcast) are both excellent examples of Bohan Li's Nantex squad avoiding heavy commitment to a board until the opposing squad has passed commitment points of their own. In the semifinal game, this is leveraged to jump on Redline, while in the final game, the Nantexes are able to wait until Rear Admiral Chiraneau has committed to a lane so that the Nantexes can safely engage from directions that RAC can no longer effectively respond to.
The next thing to consider about commitment points: they aren't always obstacles, and nor are obstacles always commitment points. In the examples above, Bossk himself was almost acting as a commitment point for Fenn Rau. Ships fully control the space they occupy until they activate on that turn, and so anything moving before them needs to consider them as a temporary commitment point. When facing lists with multiple initiative values, this is why it's sometimes very valuable to do a sanity check on the maneuvers you're anticipating from your opponent and seeing if the early initiative ships' decisions might illuminate the later moving ships choices (or perhaps vice versa).
Some ships ignore obstacles and therefore aren't bound to commit by them. Dash Rendar is of course the poster boy for this, but Grappling Strut Vultures, Mining Guild TIEs, Nantexes, or Collision Detector ships are all examples of ships that are bound by obstacles to a lesser extent, if any. You'll need to adjust your conclusions on a case by case basis, given the restrictions of the given ship; for example, Mining Guild TIEs are still unlikely to land on asteroids, strong Vulture play means the Vulture is more likely to barrel roll off the obstacle than stay on it, etc.
Ships are less likely to respect non-asteroid obstacles. A gas cloud is hardly a deterrent in a slow early game, where the action is relatively unimportant and the strain is easily cleared before an engagement. Debris clouds are also usually a tolerable obstacle, and a strong opponent will opt to accept the risk of a debris field overlap rather than take an inferior board position.
Critically, don't fall into the trap of believing that your opponent won't go over an asteroid! It's usually unlikely, but if an opponent can trade an action and 50% chance of one damage to catch you vastly out of position based on a faulty assumption, they will! Just consider that an opponent moving through an asteroid intentionally is significantly more likely than an opponent landing on an asteroid, an opponent will rarely, if ever, purposely land on an asteroid such that they'll be hitting it again the following turn, and ships with health to spare are far more likely to take such a bold action than low health ships. Bossk might have caught me off guard and yolo'd through the commitment point in the examples above, but Soontir Fel certainly wouldn't be expected to do something so reckless and potentially self-destructive.
Finally, if you're flying ships that can get early target locks (e.g. E-Wings, DRK-1 Probe Droids, Colonel Jendon, perhaps Sensor Buoy Suites), this entire post is doubly relevant for you. Waiting to observe your opponent's commitments and making educated target lock decisions based on those can make you far more likely to be able to get value from those locks in the critical early engagements. For Jendon users, don't be afraid to wait a turn or two (if no engagement is imminent) to see where your opponent is heading before spending a charge. For E-Wings, observe where your opponent is flying their ships, determine which ones you want to target first based on their indicated strategy, and target lock accordingly. For Probe Droids, send those target lock balls towards the key commitment points and prepare to lock intelligently!
Hope this helps. As always, looking forward to hearing others' thoughts on how they consider these sorts of things in game, or barring that, what clever Star Wars-y name they give to them.
 |
| "Listen, we're calling them Commitment Points now, not markers. And also, I'll see you in hell!" |
---
Hey, what are you still doing here? The post is over! Go home! Go!
Oh, right, I promised I'd tell you why my bad deployment was bad. You remembered! You must really care!
Two main things: First, you shouldn't put your high initiative pilots in front of your low initiative pilots, like how I have Fenn parked right in front of two Zealous Recruits. It worked this time because I was doing some early hard turn shenanigans with the Zealous Recruits, but it's a bad idea in general and basically makes your high initiative ship into a bonus commitment point, which is bad. This is why Howlrunner always goes in the back corner in TIE swarms! Second, don't start ships right up against each other as I did with Fenn and Nom Lumb. If you try to bank with either of them, you're going to start having all sorts of issues. Both of these mistakes give your opponent free information on what possible moves you can open with, and free information is bad!


No comments:
Post a Comment