
This was a casual game I played on VASSAL in early April 2019. I hadn't tried the Aethersprites out yet so I thought I'd give them a whirl. Unlike other games, I didn't come into this one with a fully developed plan, so there's a fair amount of improvising to see in this one! Do try this at home (and don't try this at tournaments).
My list
As mentioned above, this was my first time trying out the Aethersprite. I was pining for the days of first edition Imperial Aces, which meant I started my list with the I6 Anakin. A lot of Vader games have taught me the value of a 3 force pilot, and Mace is a great value in that respect, so he got added in next. The last ship is a toss-up between Luminara and Saesee, but I'd seen Luminara's ability do some decent work in other games against me, and I wanted to keep things fairly straightforward for my first Aethersprite match, so she was the lucky third ship. 7B on all three gives me resilient ships with a good punch and no finicky bullseye to worry about. There are no points left over for upgrades (let alone a bid for Anakin).
Opponent's list
In a fun coincidence, while I try to reimagine classic Imperial Aces, my opponent goes and brings them! Sai is a very pricey Lambda, especially with ST-321, but if it can get value from those two abilities more than a couple of times, it's going to hurt. Against an opponent flying agile ships, however, that's easier said than done. Rexler with Juke and FCS is a very strong ship; in my mind, the biggest downside with him is that while he can and often does pull his weight for the points cost, he still makes it awkward to fit enough other meaningful ships in the list. To that end, my opponent has the relatively frail Duchess as the third ship, with a Hull Upgrade and Predator. I'm not the biggest fan of bullseye talents like Predator in general, but on a high initiative Striker, it can probably work. Finally, the list includes Emperor Palpatine, who has a very strong ability that can give a lot more flexibility to the other two aces, such as allowing Duchess to evade while still retaining offensive dice mods or letting Rexler set up a target lock and immediately get double mods.
Opening strategy
Target priority for this match is perhaps a bit less obvious than it might seem at first glance. Proponents of support theory might suggest removing the Lambda first to reduce the effectiveness of the aces and make beating them more manageable. However, in this instance, my concern is that both Duchess and Rexler (especially Rexler!) are perfectly viable on their own, even without the help of Sai's coordination and Palpatine's force point. If I opt to take Sai down first, and lose Anakin in the process, I'm going to have an incredibly difficult time taking down Rexler and Duchess. Instead, I'll have to try to manage the Lambda by isolating it from the ships its trying to support and avoiding its front arc as much as possible. The downside of this is that the TIE Defender can really take advantage of that Coordinate, but it's a risk I decide I'm willing to take.
So that leaves Rexler and Duchess. Rexler is the clear dominant end game ship in my opponent's list, but the TIE Defender is very well equipped to thrive in the midgame as well, and trying to take Rexler down early can mean a lot of wasted effort, thanks to the token stacks and three agility. Without an alpha strike with a reasonable shot at obliterating Rexler, I don't want to take that risk.
Duchess is flexible but fragile. I can reasonably expect to take her out before losing an Aethersprite, leaving my opponent with only two 3-die attackers. From there, I'd theoretically be looking to remove the Lambda and then try to deal with Rexler as best as possible. If, along the way, I find myself with opportunities where Rexler is vulnerable, I'll be happy to opportunistically damage him where possible.
For my part, I plan to generally keep Luminara and Mace together as one element (at least to start) while looking to flank with Anakin. If I'm not comfortable with the amount of firepower pointed at Skywalker, I'll be looking to disengage and hop back into the fight when it's a bit safer. Especially if you can leverage his ability, Anakin has the potential to re-engage very well (reminiscent of my opponent's Defender), so he's very well suited to the task of flanking.
Deployment
I've brought gas clouds for this. My force users can fly through them while retaining mods, and the Aethersprite's ability is also unimpeded by obstacles. The gas clouds also let me leverage my maneuverability to take meaningful cover if I'm unable (or unwilling) to fully disengage. My opponent brings rocks of varying sizes. Between his large, cumbersome Lambda, the Striker with ailerons that can exploit the gas clouds by moving through them freely, and the Defender who also has an ability that doesn't care about obstacles, I'm surprised not to see gas clouds from my opponent as well, but I'm happy to make use of his rocks in this one!
I win the initiative roll and take first player, as there's no initiative overlap, and I happen to have a plan for the first obstacle.

So, after gushing about how well my ships make use of gas clouds, I slap a big rock right in the middle with the first obstacle (1). My reasoning for this goes back to what I said at the start of the Opening Strategy: I don't plan on killing the Lambda first, so I need to avoid it instead. The cornered rock is what I plan to pivot around with my ships, keeping it between my Aethersprites and the Lambda.
My opponent's first rock (2) gives me the beginnings of a tight obstacle clump. Normally, with agile arc dodgers like my Aethersprites, I'd like to have a lot of spaced out asteroids in order to leave myself with a lot of open area to freely reposition into, and avoid having fewer options and becoming predictable (and dead). However, in the immortal words of Robert Baratheon, only a fool would meet TIE Defenders on an open field! I want to have a tight obstacle field to make it harder for the Defender to K-Turn with impunity. This also gives me an even bigger no-go area for the Lambda that I can use to manage it. My next obstacles (3 and 5) continues to build this clump, while my opponent corners his next tow (4 and 6). This does leave some big, scary areas for the Defender to exploit, so I'll need to do my best to avoid getting drawn away from the obstacle clump and into open space, especially with my Initiative 4 ships.
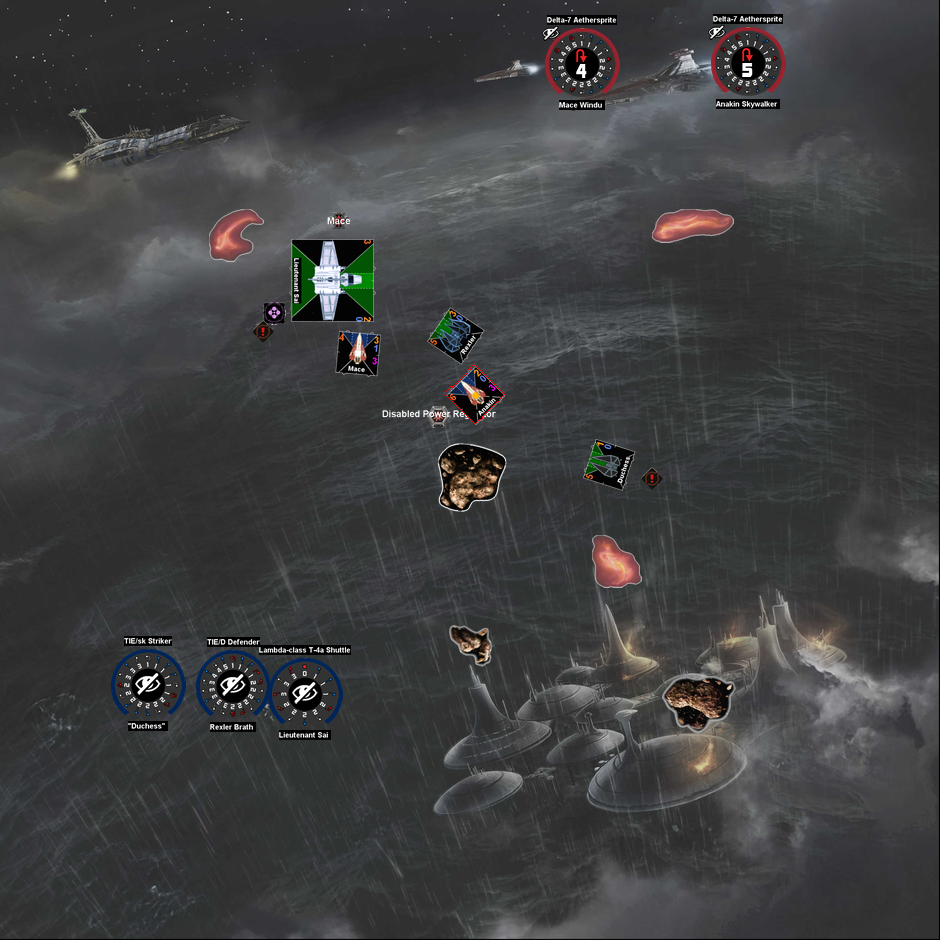
My opponent places first, and makes things easy for me by placing the Lambda in the bottom right corner facing north. Had he placed elsewhere, I would have had to spend several turns in order to get the asteroid clump positioned correctly between me and the Lambda, but as it is, I'll be able to get into action safely much earlier. I certainly don't want to joust his list head on with mine, so I place my first two Aethersprites pointed downward at top left, with the intention of heading towards the asteroid clump and using repositions to go around the clump on the opposite side of whichever way the Lambda commits. Rexler and Duchess don't do anything funny, setting up in the Lambda's corner and strongly indicating at least one turn of stalling from at least the Lambda, if not the Striker as well. Finally, I put Anakin in the corner with my other Aethersprites pointed the same way; he'll be heading in at least somewhat of a different direction, but I don't need to indicate that just yet.

All things considered, I'm very pleased with all of the Turn Zero activities in this one. Everything basically set up the way I was hoping, which isn't all that common, of course! Even the cornered gas clouds are fine by me; it might be useful having a couple oases throughout the board for my Aethersprites to run for, just in case.
Turn 1
No need to deviate from the plan yet! I'm just going to advance the Aethersprites forward for now, while hard turning Anakin to start his way across the top of the board, giving my opponent the early indication of a decision for him to eventually make on which portion of my list to pursue. I don't anticipate his Lambda will be moving so I'll be largely noncommittal here as well, although on the off chance the Lambda declares in a direction, I'll be able to react. Given the location of that large rock in the corner, basically any move other than a bump/stop will force the Lambda to either commit or land on the rocks.

Activation
- Lieutenant Sai: 2 Hard Left, Stress
- Luminara Unduli: 2 Forward, spend 1 Force to Barrel Roll Left Forward, Boost Left
- Mace Windu: 2 Forward, spend 1 Force to Barrel Roll Left Forward, Boost Left
- Rexler Brath: 5 Forward (free evade), Boost Forward
- Duchess: No Ailerons, 1 Hard Right
I honestly couldn't ask for any better. Sai is committed to a direction, Rexler's going that way as well (and has gone so far forward that he is fully committed to going past the obstacles), and my intended target is going off all on her own. I'm going to have to deal with Rexler back dooring me before long, but it's not as if my Initiative 4's were going to be arc dodging him much anyway during the early-mid game.
Anakin's choice is now made as well: flanking by running down the left side of the board would be a bit more risky than I'm willing to go, so he'll run across the top and work with the other Aethersprites to flank Duchess. That said, there's an argument to be made for Anakin to run south toward the Defender and Sai and try to distract them by provoking Rexler and/or Sai to try to go for him and then arc dodging them. However, it's a bit more aggressive and risky than I'm feeling this game, so I take the more conservative approach. There are merits to both approaches, though.
- Anakin Skywalker: 1 Hard Left, spend 1 Force to Barrel Roll Left Forward, Boost Right
No combat, so everyone goes back to full Force and we move to dials!

Turn 2
With Sai and Rexler committed, I now want to get my Aethersprites past that asteroid clump and pressuring Duchess as quickly as possible, so I'll be banking and repositioning past the big rock as needed. I'll go straight with Ani instead of banking toward the top edge; I want him to be able to dive Duchess if the opportunity presents to get all three guns on her early on.
I assume Sai will be going 1 or 2 forward to clear stress and coordinate, and Rexler will be banking or hard turning in. I'm not sure what Duchess is up to, but it doesn't affect my plan all that much; I'll be engaging her this turn or next, in all likelihood.

Activation
- Lt. Sai: 1 Forward, Coordinate Rexler Brath (Focus), gain focus (no ST-321 lock)
- Luminara: 3 Bank Left, spend 1 Force to Barrel Roll Left Forward, Boost straight
- Mace: 3 Bank Left, spend 1 Force to Barrel Roll Left Forward, Boost straight
The rock's position forces Luminara to roll left to avoid it, which then forces Mace over to stay lined up. I was hoping I'd be able to scrape by the rock without the barrel roll being necessary, but I was prepared for and comfortable with this. Positionally, these two moves commit both Aethersprites to going past the big rock, but I don't imagine bluffing the notion of going the other way and jousting the Lambda would have gone far regardless. It does, however, give Duchess more information for the coming turns, which will make her harder to pin down. Especially with her initiative and her ability, she has between a two and three turn advantage on moving at this moment.
- Rexler: 3 Bank Right (free evade), Boost right
Confession time: I was a huge Defender fan in first edition, even during the dark days before their perfectly fair and balanced x7 titles, so I tend to forget that they can boost in second edition (and thus how quickly they can get around). I wasn't quite anticipating Rexler being able to get all the way around and potentially shooting at Luminara, especially after my barrel rolls. It's not a big deal, hopefully, but it's going to be an unanswered attack sooner than I anticipated.
- Duchess: Ailerons Bank Left, 2 Bank Left, Focus
Also a little surprising at the time, although there's really no reason it should be. Duchess is extremely capable of navigating the asteroids without becoming super predictable. I become concerned now that it might be difficult for both Lumi and Mace to get shots on her next turn; certainly Anakin is going to have to play catch up.
- Anakin: 3 Forward, spend 1 Force to Barrel Roll Left Backward, Focus
Combat
- Rexler attacks Luminara (range 3), 1 shield damage, -1 Force
An annoying free shot that makes next turn significantly more annoying, now that I can't reposition and still have the force for an attack mod. I'm disappointed with myself on this; from a tactics standpoint, it's difficult to defend the idea of giving up unanswered shots in the opening like this even when they don't do damage, let alone eat into both shields and Force. With rare exception, being shot at without being able to return fire on turn 2 is a blunder, although perhaps only a minor one here.
Incidentally, perhaps the other Anakin play discussed earlier now looks more appealing, in hindsight. If we'd followed that line of play, Rexler would now have to consider Anakin, and Anakin might be attacking Rexler himself. However, that said, given Duchess' direction, the next two turns would be fairly perilous as a Rexler K-Turn and a Duchess advance would leave Anakin trapped in that southwest corner, trying to dodge 3 enemy arcs with all manner of dice mods, while the other two Aethersprites race to get into the fray and support.
So perhaps this line of play is fine after all.
Back in the actual game, everyone regenerates some Force, and we go back to dials.

Turn 3
The chase in on to try to get shots on Duchess. She's committed to going into or through the obstacles, so I'll look to get my Aethersprites there as quickly as possible. I'm choosing to abort a lengthy flank with Anakin now in favour of just massing guns, as the flank would now only serve to reduce the firepower I have in play. I need to consider the Lambda turning into the middle of the obstacles here, but it's not something I can really do much about this turn. If I try to avoid the Lambda doing that, I'm likely compromising overall positioning, or exposing myself to other attackers, depending on how I try to handle it.
Another alternative here would be to play it a bit more patiently and just start flying to roughly my opponent's starting position, in order to really stick to the original plan of keeping all the obstacles between me and my opponent. However, I foresee that resulting in more unanswered shots from Rexler in the short term, and I can't play that game for very long thanks to my non-infinite Force pool and his Juke. Ultimately, I don't play for the long game and opt to dive the obstacles, but this might be the wrong call. Despite things feeling like they were going according to plan, the sense I have at this point is that I am engaging on my opponent's terms and not my own. My decision to go into the tight asteroid clump is going to leave me predictable and far more easy to outmaneuver, and it's arguably a mistake for that reason alone.

Activation
- Lt. Sai: 3 Forward, Coordinate Rexler Brath (Focus), gain focus (ST-321 lock on Luminara)
- Luminara: 2 Hard Right, Lock (Duchess)
- Mace: 2 Hard Right, spend 1 Force to Barrel Roll Left Forward, Lock (Duchess)
This is not a random barrel roll, despite perhaps seeming to be. The barrel roll with Mace does a few things, but mostly I did it to open up maneuvering options for the next turn; I don't anticipate having much pressure on Mace's Force this turn so I'm okay spending one here. Now, he has a different vector going into the obstacle clump than Luminara, so that my opponent has to consider two different elements; this is important since I'm making myself so much more predictable in general going into this corridor. This barrel roll also means that Mace is no longer telegraphing going into the asteroids at all (compared to Luminara, who is fully committed), forcing my opponent to at least consider that Mace might just speed around them and threaten things like Sai, or a retreating Duchess.
- Rexler: 3 Bank Right (free evade), Lock (Luminara)
Leaving Rexler here commits Sai to coordinating a barrel roll next turn (denying Sai the free focus) or will force Rexler to go through the asteroid.
- Duchess: Ailerons Bank Left*, 3 Right Bank (bumps Sai)
I didn't notice at the time but my opponent used a 2 bank on the ailerons maneuver instead of the 1. That said, the end position doesn't change significantly (Duchess would have bumped between Sai's mid-line and back corner instead of directly on Sai's back corner), so this isn't a hugely impactful issue, fortunately.
- Anakin: 5 Forward, Evade (spend 1 Force)
Anakin's position is clogged up by the other two Aethersprites, and there are no repositions that can get me through or around that is particularly advantageous for this turn or next. The only thing I might have done differently is barrel roll left backward, allowing me to bank or turn in next turn and catch Rexler on a K-Turn. I take the Evade but there's little to no chance Rexler chooses not to shoot Luminara.
Combat
- Rexler attacks Luminara (range 2 obstructed), Rexler spends lock and focus, 2 shield damage, -1 Force
- Luminara attacks Duchess (range 3), Luminara spends lock, no damage
Luminara's lost Force from last turn costs her here. Unfortunately, I'm not able to take advantage of Duchess' bump, and I've lost half points on Luminara. My position moving into the midgame is not particularly strong, so I'll need to play catch-up in order to take control of the game. Everyone regenerates Force (Luminara is still on 1 Force) and we're back to dials.

Turn 4
We're into the midgame now. Rexler's stuck behind the rock, but he's a Defender with ships heading past him, so the 4K is the obvious move and I don't see better alternatives. I can't do much about it with my I4 Aethers, so their task remains the same: pursue and destroy Duchess by banking in. Anakin, however, should be able to finally become the flanker he was intended to be. A sloop to the left should leave him right behind Rexler's 4K, clearing stress and hopefully punishing the Defender nicely. Sai will be turning in, and Duchess will either be doing the same or slooping, but either way I'm intending on continuing to press on her.
It's a decent plan, but I've had a mental lapse and forgotten something critical here. Did you catch it?

Activation
- Lt. Sai: 2 Bank Right, Coordinate Rexler (Barrel Roll Right Forward)
Yep, it's the coordinate that I predicted last turn and then promptly forgot was a thing that could or would happen. I kick myself hard the moment I see it. A barrel roll in either direction was painfully obvious, but I've gotten distracted with trying to figure out what sloop or K-Turn to do with Anakin that I've forgotten my target won't even be where I'm expecting him. Thanks to my mental misstep, I've allowed my opponent to outplay me, plain and simple.
- Luminara: 2 Bank Right (bumps Rexler)
- Mace: 2 Bank Right, Focus
Whenever you read articles suggesting tight rock placements favour arc dodgers, consider situations like this. Mace is totally pinned down and unable to do anything really constructive because of Luminara and the tight obstacles. If so much of my arc dodger's value is in the repositioning ability, what does a tight obstacle cluster do for that value?
- Rexler: 4 K-Turn (free evade), Lock (Luminara)
- Duchess: Aileron Bank Right, 1 Hard Right, Focus
Rexler does the obvious and correct maneuver, locking to secure a double modded shot (thanks to Palpatine). Duchess plays aggressively, perhaps more aggressively than was really necessary, but I suppose my opponent wants to snowball here and try to secure a kill on Luminara rather than give me opportunity to stabilise. It's a smart call; he now has a roughly 71% chance of initiative-killing Luminara here.
- Anakin: 2 S-Loop Left, Stress
With Rexler having exploited my fallible mind, Anakin doesn't have the blow-out turn he was looking for. Instead, he's just in an awkward position, shooting nothing.
Combat
- Duchess attacks Luminara (range 2), spends Palpatine Force, 1 hull damage
- Rexler attacks Luminara (range 2), no damage
A very lucky break. Spending the force on Duchess' attack was probably sub-optimal, spending the focus instead for the initiative kill is likely stronger. Also, I believe my opponent forgot about his Rexler TL and so didn't spend it (his roll was eyeballs and a blank). Luminara is saved by luck and some minor missteps (but my opponent will have to blunder much harder than that to keep up with my mistakes).
- Luminara attacks Duchess (range 2), spends 1 Force, 2 hull damage
- Mace attacks Duchess (range 3), spends Focus, 2 hull damage
More luck for me, I do 4 damage where realistically I might have expected one or two at best. Dice variance is smoothing over the rough spots of my opening. That Hull Upgrade on Duchess has worked out nicely for my opponent, at least. With that, Force is regenerated and we're back to dials.

Turn 5
Going around the asteroids was my plan, going through them wasn't. My options are relatively limited here, so I need to strongly consider how predictable I want to be. Looking at the opponent's position, I'm anticipating Sai doing a 2 Hard turn in towards my ships. Predicting Duchess is annoying enough without the added possibility of a pre-activation coordinated barrel roll, so my strategy there is to broadly project likely ending points and consider blocking places I don't want her to go. Finally, I anticipate Rexler to either go straight slow to shoot Lumi or Mace or possibly to K-Turn to threaten Anakin; the latter would be pretty greedy and dubious. Other alternatives, such as Rexler hard turning right, are acceptable as they don't really threaten me this turn.
Given the above, I'm going to try to restrict Duchess and block what I can from Rexler while trying to salvage Anakin's board position without restricting his options too badly for next turn.

Activation
- Lt. Sai: 1 Bank Right, Coordinate Duchess (Focus), gain focus
- Mace: 1 Bank Right, bump Luminara
- Luminara: 1 Hard Right, Barrel Roll left backward
Mace bumps to block a 2 Forward from Rexler. Luminara rolls to shut down some of Duchess' non-ailerons maneuvers. I choose to use her action to barrel roll instead of spending Force. My thinking at the time was that I was optimistic I'd be perhaps going back to full Force during the next turn. In hindsight, I'm probably better off just Force barrel rolling and grabbing a focus.
- Duchess: Ailerons Bank Left, 3 Bank Right, Evade
- Rexler: 3 Bank Right, bump Mace
Duchess flees, which is understandable and gives me a bit of breathing room. Rexler's move was somewhat unexpected (clearly he intended to barrel roll), but I still get the bump and Rexler's next turn is now much more awkward.
- Anakin: 1 Bank Left (clear stress), Lock (Rexler)
Remember earlier when I mentioned I'd be happy taking opportunistic shots at an exposed Rexler? This was precisely the type of situation I had in mind. While a kill shot on Duchess is awfully tempting, I don't expect to get great opportunities to nail Rexler often, so I feel it's worth spreading the damage around to take what I've been given.
Combat
- Anakin attacks Rexler (range 1), spends 3 Force, 3 shield damage
It costs me all of my Force, but I'll take it to knock most of Rexler's shields off. This is a nice swing in momentum. If Win Probability Added existed in X-Wing, this would be a pretty decent spike in it.
- Rexler attacks Luminara (range 3), 3 hull damage, Luminara dies
And the momentum slams back the other way again. Even though I'd blocked Rexler, between the target lock and Palpatine's Force, Luminara surviving here was essentially a coin flip. I still got a ton of value from the block both with Anakin's attack and Rexler's compromised position, but it's a great reminder that you need to consider all the sources of dice mods for a potential block victim when considering how aggressive you're willing to be to block.
- Mace attacks Sai (range 3), spends 1 Force, 1 shield damage

Turn 6
The board position is mixed for both sides. Duchess' flexibility will allow her to get back into the mix relatively easily, but she needs to be cautious to avoid Anakin, given her health. Neither of my ships have a ton of options. For now, I'll look to get Mace clear of the asteroids for future turns (and likely get some more free damage on Sai in the process) and turn Anakin north to try to kill Duchess (or, failing that, at least force her to flee further). I don't see any particularly good way to press the attack further on Rexler right now; a sloop from Mace would probably give me a shot, but it would almost certainly be at range 3 and/or obstructed, and Mace would then be committed to going right back into the obstacle mess.

Activation
- Lt. Sai: 3 Forward, Coordinate Duchess (Focus), gain focus (no ST-321 lock - forgot?)
Sai never does quite what I think he'll do. Fortunately, being a Lambda, his options are so limited that I don't need to predict with any precision to account for that ship and avoid its arcs. That's not to say he hasn't been valuable, though, as his coordination is now giving Duchess repeated turns of token stacking.
- Mace: 2 Bank Right, spend Force to Boost Bank Right, Barrel Roll Right Forward
Sai's fast move forces a barrel roll to dodge the rear arc, but I'm inclined to anyway to keep my arcs as close to Duchess as possible.
- Rexler: 1 Hard Right, Stress
- Duchess: Ailerons Bank Right, 1 Hard Right, Evade
- Anakin: 1 Hard Right, bump Rexler
The Rexler move is a surprise, as I'd misjudged the board and convinced myself he couldn't do it without bumping. It results in an awkward bump, with Duchess moving up perfectly to capitalise.
Combat
- Anakin attacks Lt. Sai (range 3), 1 shield damage
- Duchess attacks Anakin (range 1), 3 shield damage
- Mace attacks Lt. Sai (range 1), Lt. Sai spends focus, 2 shield damage
My bump costs half points on Anakin, the delayed cost of my decision to put damage on Rexler last turn instead of trying to kill Duchess. Half points on Sai is a poor consolation.

Turn 7
Duchess is essentially out of grasp for now; she simply has too many options this turn that would get her free of Mace's arc, the only ship I have that can feasibly try to go for her. My approach this turn is to point arcs to the north of the board; if I can catch Rexler exposed, I'll maybe take a shot at him, but otherwise, this will be a turn for damaging Sai. I'm a bit concerned about Duchess purposely blocking Anakin in place for a second turn in a row, but I think he's much more likely to Segnor's behind me instead.

Activation
- Lt. Sai: 2 Hard Right, Stress
- Mace: 1 Bank Right, Lock Sai
- Duchess: Ailerons Forward (bump), 2 S-Loop Left, Stress
- Rexler: 1 Bank Left (clear stress), Evade
- Anakin: 1 Hard Right, Focus
Things go pretty well for me, here, all things considered. I did debate using Anakin's action to move my lock to Sai and go for the kill this turn, but ultimately decide that this is another decent opportunity to put damage on Rexler. As in the last scenario, it's a decision with a cost, as a locked Anakin and Mace together are pretty likely to initiative kill the Lambda. However, it's not quite a sure enough thing for me to go for it. Had the Lambda been at even one less hull, I think I would go for it, but as it is, I don't want to end up leaving the Lambda alive (since it's bound to die in the next turn or so anyway) and also miss out on a chance to damage Rexler.
Combat
- Anakin attacks Rexler (range 1), Anakin spends lock and focus, Rexler spends Evade and Palpatine's Force, 1 shield damage
I was hoping for more, but this is a deceptively tough shot; while I have an 86% chance of doing a damage (and thus getting half points on Rexler), there's only a 32% chance of getting that second damage through.
- Duchess attacks Anakin (range 1), rerolls with Predator, no damage
- Rexler attacks Mace (range 1), 2 shield damage
- Mace attacks Sai (range 1), 3 hull damage plus 1 extra hull damage (Direct Hit!)
- Lt. Sai attacks Anakin (range 2), 1 hull damage and Disabled Power Regulator
Well, if I'd known that's how the attacks were going to go, I definitely would have focused on Sai this turn! On the bright side, unless I really mess things up next turn, that was Lt. Sai's last shot. Everyone goes back to full Force and back to dials!

Turn 8
Sai being stressed this turn makes my life easier, since I don't need to plan around the 0 stop. As long as the Lambda moves up (even just to bump Rexler), I'm confident I can land a 5 K-Turn for Anakin, which should either give me a kill shot on Sai or a range 1 on Rexler if he chooses to K-Turn as well (I anticipate that he will). Mace will K-Turn as well, looking to have shots on one or both of those targets as well. Ideally, he'll be able to shoot at Sai so I can let Anakin use his attack elsewhere. There's also an off-chance that Duchess comes in close enough to take down, but that seems like something to worry about next turn.
I do consider that Sai might coordinate Rexler and then Rexler will do something unexpected, but none of the outcomes I consider there affect my plan too much, so I accept it as a possibility and proceed.
Activation
- Lt. Sai: 1 Bank Left, Coordinate Rexler (Barrel Roll Left Backward)
- Mace: 4 K-Turn, Stress
The kill shot for Mace is confirmed. With his lock from previous turns, Mace's chance to kill Sai is way up in the >99% range, so Anakin can shoot whatever else happens to stray into his arc.
- Rexler: 4 K-Turn, Focus
- Duchess: No Ailerons, 1 Bank Right (clear Stress), Focus
- Anakin: 5 K-Turn, spend 1 Force to clear Stress, Lock (Duchess)
Duchess being in range of Anakin is a nice surprise, as is Duchess choosing not to Evade. This has the potential for a big turn.
Combat
- Anakin attacks Duchess (range 3), spends Lock and 1 Force, no damage, Anakin gains 1 ion
My target lock fails me and Duchess escapes unscathed, not even spending the focus token. Very nearly the worst possible outcome, unfortunately.
- Duchess attacks Mace (range 3), no damage
- Mace attacks Lt. Sai (range 1), spends target lock and 3 Force, 3 hull damage, Lt. Sai dies
I get the kill, but it costs me all of Mace's Force, and he's two turns away from a red maneuver to recover it faster. Still, a kill is a kill.

Turn 9
The lack of Duchess kill on the last turn makes this turn much more annoying. My biggest concern is Rexler K-Turning and finishing Anakin off, so I plan to block it with Mace; this might also keep Mace safe from Duchess (assuming she does something like aileron right and hard turn left, for instance) and set up a pincer on the Striker for the following turn. Anakin's ionised, but Fine-Tuned Controls doesn't get prevented by that, so there's a chance my reposition might get me some value here.

Activation
- Mace: 2 Bank Left (clear stress), spend 1 Force to Barrel Roll Right Center, Boost Left
- Duchess: 2 S-Loop Right, Stress
Wasn't quite expecting this; it means a shot on Mace with zero Force.
- Rexler: 3 Hard Left, Lock (Anakin)
- Anakin: 1 Forward (ion maneuver, clear stress), bump Rexler
Duchess' move makes even more sense now. It's a clever move by Rexler, preventing me from exploiting Fine-Tuned Controls and exposing me to a pot shot from Duchess that might tax my force a bit, let alone do damage.
Combat
- Duchess attacks Mace, rerolls with Predator, 1 shield damage
He opts to take the modded shot on Mace instead, getting half points. That damage is brought to you by Hull Upgrade, the upgrade that has quietly just kept on giving for my opponent this game.

Turn 10
Clearly I need to kill a ship or else I'm going to keep hemorrhaging hull. This turn, I'll look to dial somewhat conservatively. Sloops from both of my Aethersprites should cast a wide enough net that I catch most maneuvers that aren't hard disengages, and this will ideally be the last turn for Duchess. The sloop has a few added benefits: Mace badly needs the force back, and I think there's a decent chance I can catch something in Anakin's bullseye and ditch the stress. Rexler is almost certainly doing a 4K, which gives him relatively poor or no shots on my ships.

Activation
- Mace: 2 S-Loop Right, Stress, Regenerate 1 Force (2 remaining)
- Rexler: 4 K-Turn (free evade), Focus
- Duchess: 2 Bank Left (clear stress), Focus
- Anakin: 2 S-Loop Right, Stress, spend 1 Force to remove stress (2 remaining), Lock (Duchess)
Anakin catches Duchess' back corner by a hair, which makes or breaks this turn.
Combat
- Anakin attacks Duchess (range 1), spends lock and 1 Force (1 remaining), 1 hull damage, Duchess dies
- Rexler attacks Anakin (range 3), spends Focus, Anakin spends 1 Force, 1 hull damage and Damaged Sensor Array, Rexler exposes Disabled Power Regulator
- Mace attacks Rexler (range 3), no damage
The crit on Anakin is rough. Now, my opponent doesn't need to block him to prevent me from using Fine-Tuned Controls when ionised, not to mention that my arc dodging is just generally impaired at this point. This drastically changes the end game from something that was fairly favourable to me into something that is even, or worse. (Note: Anakin's displayed hull value is incorrect for the next few turns.)

Turn 11
So we've arrived at an endgame that should prove challenging, starting with a very key turn here. Rexler is shieldless but still able to manage a lot of incoming data, thanks to his steady diet of evades that I'm going to be testing less and less now that my ship count is dwindling. Anakin is limping and is no longer able to avoid and/or bully Rexler the way he would if he weren't bogged down by his crits. Once Anakin is gone, time is on Rexler's side, as he can use his repositioning to avoid engagements he doesn't like and bide his time for either a favourable exchange or the timer. I'll need to avoid moving too predictably with Mace (which will require both leaving his options fairly open and occasionally avoid the most optimal but predictable maneuvers) and try to keep Anakin safe, if possible.
On this turn, I'm hoping to at least get some shots with Anakin. I'm not entirely sure where Rexler is going here. I don't think the 4K seems terribly likely, but Rexler is likely going to anticipate me advancing slowly (1 banks from both of my Aethersprites, perhaps) and plan accordingly. Given the amount of uncertainty, it's likely he just goes fast to get to safety and try to fight my ships one at a time during the following turns, but I consider that he might try to bamboozle me by hard turning toward the east side of the board too. My dials are basically set to cover a few of these alternatives; I'd prefer to focus on one likely location, but frankly I just don't have a great read on Rexler this turn.

Activation
- Mace: 1 Bank Right (clear stress), spend 1 force to Barrel Roll Left Backward, Lock (Rexler)
- Rexler: 5 Forward (free evade), Boost Forward
- Anakin: 2 S-Loop Left, Stress, spend 1 force to clear stress, Focus
I make a half-hearted attempt with Mace to block the Defender's forward maneuvers, but it's a bad eyeball and I'm not really close. Rexler does choose to go fast in order to set up better engages for the future. My S-Loop with Anakin works nicely, but I make the dubious decision of Focusing instead of fixing my action crit. I believe my thinking at the time was that Anakin was doomed soon anyway so I would take the focus in the hopes of a big attack roll (which I would get!), but in hindsight this is a mistake; the better choice is playing for the next turn, where I could Fine-Tuned off of the ion maneuver and possibly get some safe distance from Rexler.
Combat
- Anakin attacks Rexler (range 1), spends focus, 2 hull damage
Close but not quite enough. Mace's missed block leaves him out of position and unable to take a follow-up shot that might have ended the game here.

Turn 12
Last turn was the turn I really needed to end things and put the game away. Now, I've lost the positional advantage I had, and am moving towards a situation where Rexler can start finishing off my ships. My mistake last turn in not fixing Anakin's crit means I can't boost for a shot this turn. I'm now just hoping to get one more shot and for Rexler's dice to blank out. When your plan in X-Wing sounds something like this, you are almost certainly losing!
Rexler is K-Turning here, almost without question. If Mace sloops, he might be out of range, so my only choice to get a win is a hard turn with boost, and then hope my double modded shot doesn't fail me. Unfortunately, there's a small flaw with this plan: Rexler is a higher initiative and would block that. I realise my error in time to fix the dial, but I know that this means there likely won't be a shot for Mace this turn.

Activation
- Mace: 2 S-Loop Right, Stress
- Rexler: 4 K-Turn (free evade), Focus
- Anakin: 1 Forward (ion maneuver), Focus
Combat
- Rexler attacks Anakin (range 3), spends Focus, no damage
Anakin survives the errors of his player! Mace has no shot, as anticipated.

Turn 13
Two ways to approach this turn: I can disengage with Anakin, fix his crit, and hope to come back for a kill later (but risk losing Mace by then), or I can sloop here and try to get both guns on Rexler to score that last hit and win. I choose to push for the kill shot, as this seems like about as good an opportunity as I'll get to put multiple arcs on the Defender.

Activation
- Mace: 2 Forward (clear stress*), bumps Anakin
- Rexler: 3 Bank Right (free evade), Boost Left
The moment I see this maneuver from Rexler, I realise a bank would have been better, but my thinking at the time was that Rexler would go straight.
- Anakin: 2 S-Loop Left, Stress
I choose to keep the stress with Anakin, but again, the wiser decision was probably to ditch it, grab the focus, and hope for the kill.
Combat
- Anakin attacks Rexler (range 1), no damage
It was a 64% chance to get a kill (and in a situation like this where time is not quite on my side, that;s within my risk appetite), but Anakin can't get it done. To demonstrate the cost of my mistakes, if I had fixed that crit earlier and was doing this attack with 1 Force (spending one to clear stress) and a target lock instead, the chance to get the kill is over 82%. Alternatively, if Mace had banked this turn and been able to follow up Anakin's shot with a Force-modified shot, it's an 86% chance of a Rexler kill.
It's hard to draw a more actionable lesson from this than "don't make mistakes in the endgame," but it really does drive home that these relatively innocuous decisions need to be really carefully considered by the end of the game. It's easy to start making little mental mistakes this late in the game (you'll notice I've forgotten to clear stress on Mace this turn, for instance), and this is just one casual game, not the fifth or sixth game of tournament Swiss. Don't get lulled into rushing these last turns, and give your decisions a quick final logic check.
- Rexler attacks Anakin (range 1), 3 hull damage and Wounded Pilot, Stunned Pilot
Anakin is dead and Mace is barely out of arc. I'm now in incredibly bad shape.

Turn 14
Forgetting to clear stress is frustrating here, especially since I don't need to grab a lock. Had I not had the lock already, that would be the goal here, ensuring that the one shot I hope to get before dying will be a kill. That said, it's not looking very good. I presume Rexler will be K-Turning, I dial a 3 straight to get distance and to leave multiple options for next turn's K-Turn. Banking toward the rocks might have been better, but I was concerned it would expose me to a range 2 attack this turn.

Activation
- Mace: 3 Forward, spend 1 Force to Boost Left, Focus
- Rexler: 4 K-Turn (free evade), Boost Right
Combat
- Rexler attacks Mace (range 3), no damage

Turn 15
More sloppy play from me here. I decide to sloop left, although this is probably the one turnaround maneuver that leaves the most opportunity for Rexler to arc dodge me. My thought process at the time was that it might have been the least expected and therefore the least counterable, but there are limits to how unpredictable you should be at the cost of deviating from fundamentally strong maneuvers. I stray a bit beyond those limits with this one.

Activation
- Mace: 2 S-Loop Left, Stress
- Rexler: 3 Bank Left (free evade), Barrel Roll Left Forward
Arc dodged, as expected. Any other U-Turn either guarantees a shot for Mace, or at worst, prevents any fire from being exchanged.
Combat
- Rexler attacks Mace (range 2), Mace spends 1 Force, 1 hull damage and Fuel Leak

Turn 16
I'm another two turns away from shooting, if then. We're in conceding territory, realistically, but I decide to keep hope alive and go for the big finish! Rexler and Mace are in a situation where both are guessing whether the other one will go fast or slow. I decide to look to the ancient wisdom: "If you can't guess what a Defender is doing, assume it's a K-Turn."

Activation
- Mace: 1 Bank Left, spend 1 Force to Barrel Roll Left Backward, Focus
- Rexler: 4 K-Turn (free evade), no action
Sometimes the ancient wisdom is correct.
Should have repaired the Fuel Leak, but was worried about getting shot and wanted to be able to avoid it without spending all my Force. The logic behind that doesn't hold up, though.

Turn 17
Unless he wants to really surprise me, this is another K-Turn from Rexler. Nothing else for it but to hard turn and go for the kill, and hope I don't get killed first, since there's no way to get my shot and dodge his too.

Activation
- Mace: 1 Hard Right, spend 1 Force to Boost Right, repair Fuel Leak
- Rexler: 4 K-Turn (free evade), Focus
Combat
- Rexler attacks Mace (range 2), spends focus, Mace spends 2 Force, 1 hull damage, Rexler exposes Fuel Leak
- Mace attacks Rexler (range 2), spends target lock, no damage
Even if I hadn't had to spend my Force on defense, this was only going to be around a 60% shot at a kill, but once the Force was gone, I was depending on too much luck. My target lock rerolls into blanks, and the game is now almost certainly lost.

Turn 18
Fleeing, grabbing a target lock when safe, and trying to get one last double modded shot down the line is wiser, but it's academic. No tournament game would still be going at this point, and even a formal VASSAL game would be done in one more turn. After 18 turns, I'm going to make my stand here and be done, one way or the other. Rexler will be K-Turning again, and if I somehow survive it and don't kill him this turn, I'll be tipping my king over regardless.

Activation
- Mace: 2 S-Loop Left, Stress, regain 1 Force (2 remaining)
- Rexler: 4 K-Turn (free evade), Focus
Combat
- Rexler attacks Mace, 1+ hull damage, Mace dies.
The game ends in defeat, 155-200.
Closing Thoughts and Lessons Learned
It would be easy to point at a couple of those attack rolls that didn't quite break my way (such as turns 8 or 13) and point at those as reasons for my defeat, but that would really be letting myself off way too easy. The fact is, I made key mistakes at various times in the game that cost me from having situations where the odds would be strongly in favour of me securing a win.
I think I probably deviated a bit too strongly from my opening plan by diving the rocks with Luminara and Mace. It forced me into fairly predictable maneuvers, and I ultimately lost Luminara without getting nearly as much value out of her as I needed to.
I lost my focus near the end of the game and kept trying to push for a win instead of playing for a win several turns away. It was unnecessarily short-term thinking, leading me to grabbing tokens when I should have been fixing crits.
Ultimately, I could sleep at night with how I played until around Turn 10, at which time I think I just keep making little positional errors and suboptimal decisions that result me in missing multiple opportunities to close the game out. I leave the door wide open for my opponent to take the win, and to his credit, he takes advantage of that opportunity.
I enjoyed the list, but I don't know that it's the best use of Aethersprites. The helpless feeling I was getting when going up against higher initiative ships with repositioning wasn't terribly encouraging, and with no bid, that could even be Anakin. I don't love the idea of being wantonly preyed upon by Supernatural Anakins with bids, or Soontir Fels, or Fenn Raus.
Thanks for reading, please feel free to share your thoughts and observations in the comments below! What horrific misplays did I fail to identify? What made you angrily shout at your screen? Let me know!


No comments:
Post a Comment